Set up EasyCare Tx 2
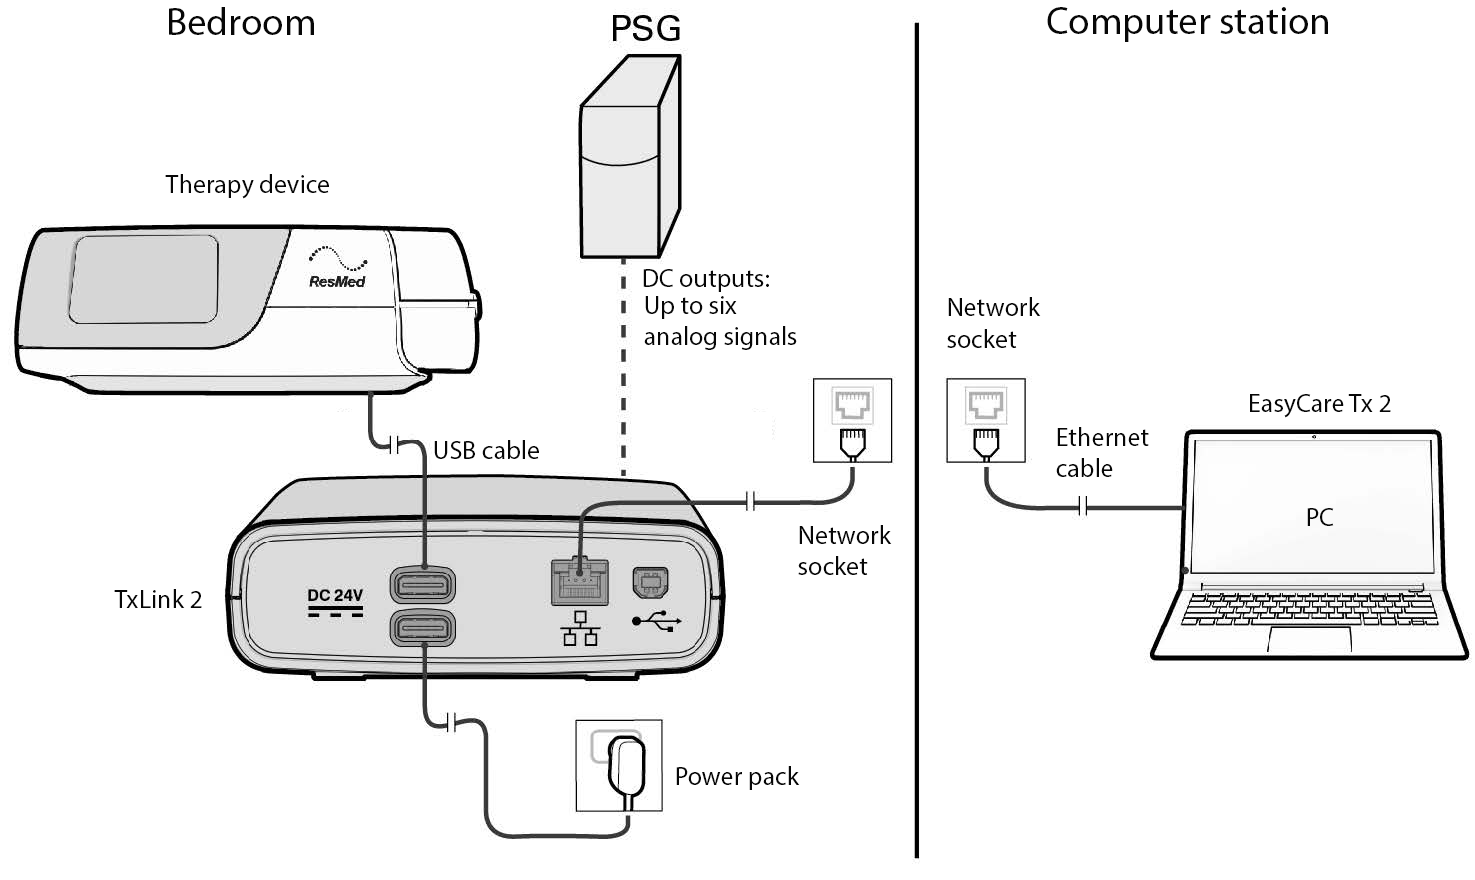
After you install the EasyCare Tx 2 software, you can connect the TxLink 2, AirSense 11, AirCurve 11, or AirCurve 11 VPAP Tx, and PSG as shown in the diagram. Please refer to the EasyCare Tx 2 Titration Equipment Installation Guide for more information.
EasyCare Tx 2 relies on standard network protocols to communicate with the TxLink 2 device. Devices are discovered on the local network via Universal Plug and Play (UPnP) and HTTP protocols using ports 1900 and 8080. You create trusted connections to a discovered device from the Add tab in the Administrator window which uses secured web services via port 8443.
Follow these links for more information on configuring a new TxLink 2 device or upgrading the firmware on an existing TxLink 2 device.
Important
Digital integrations with PSGs may be available. Speak with your ResMed representative for details.
Log in to EasyCare Tx 2
After you make the physical connections between the Tx Link 2, the PSG and the ResMed therapy device, you can open EasyCare Tx 2 and log in.
EasyCare Tx 2 relies on your organization’s Windows login policies to gain access to the program's features. You can log in using your Windows username and password. If you are currently using EasyCare Tx 2 on a computer that is part of a domain, you can log in to EasyCare Tx 2 with the same credentials you use to log in to Windows. Alternatively, you can log in to EasyCare Tx 2 using your local account credentials, if you have a local account.
Windows enforces all group policies associated with your account when you log in to EasyCare Tx 2. For domain-based accounts, you can log in to EasyCare Tx 2 from any computer that is part of the same domain and has EasyCare Tx 2 installed.
Important
The credentials you enter are for validation purposes only and are not stored anywhere in EasyCare Tx 2.
Connection Manager
If you have more than one trusted TxLink 2 device connected to EasyCare Tx 2 on your computer, you will see the Connection Manager window when you log in. The Connection Manager window lists all secure connections of TxLink 2 devices on this computer. It also displays the status of each TxLink 2 and its attached therapy device.
Important
If EasyCare Tx 2 fails to discover any TxLink 2 devices on the network, it displays a device discovery window. On this window, you can try to discover devices again, or you can click Continue to advance to the Connection Manager.
You must have Windows administrator access to securely connect EasyCare Tx 2 to a TxLink 2 device. Once you make a secure connection, the Connection Manager displays the trusted TxLink 2 device and its associated PAP machine. After an administrator securely connects the TxLink 2 device, any user can open a titration window on the TxLink 2 by clicking Connect. If you have saved any User therapy settings, you can load them in the Connection Manager window.
Important
Only Windows administrators can configure and add new TxLink 2 devices to the network. Clinical users can access and use all other administrative functions.
Right-click the EasyCare Tx 2 icon on the desktop and select Run as Administrator.
Enter your Windows administrator username and password.
Log in to EasyCare Tx 2 using your Windows username and password. The administrator Dashboard loads.
Click Add.
Use the device name or serial number to identify the TxLink 2 you want to control, and then click the expansion arrow on the right side of the row.
Select Show in Connection Manager to securely connect to this TxLink 2.
Click the Dashboard tab. The TxLink 2 now appears in the trusted devices list for this computer.
Any user (including clinical users) can switch to the Connection Manager tab and click Connect to open a titration window for the added TxLink 2 and its attached therapy device.
Important
If no TxLink 2 device is discovered, you won't see any any device details on this screen. You can search for a TxLink 2 device with a known IP address by entering it in the Manually add a device with IP address field.
Note: A Titration Equipment Installation Guide is available on the ResMed website for administrators.
Configure and calibrate
To use a TxLink 2 with a PSG system, you must complete the following three steps to configure and calibrate the DC output signals.
DC output settings are stored for each TxLink 2, so you must repeat the steps described here for every TxLink 2 device. (Learn how to save and load DC output signal configurations.)
For help configuring and calibrating the TxLink 2, contact a ResMed representative or ResMed Technical Care. For help with PSG-related questions, see the PSG manufacturer's documentation.
Configure DC output signals
You must configure and calibrate each TxLink 2 DC output signal connected to the PSG. Each TxLink 2 device supports up to six DC Outputs (labeled A to F). The following table lists the DC output signals you can configure according to your clinical requirements.
Display | Options screen, Real-time data | DC outputs |
|---|---|---|
Mask Pressure | Yes | Yes |
Patient Flow | Yes | Yes |
Leak | Yes | Yes |
Respiratory Rate | Yes | Yes |
Tidal Volume | Yes | Yes |
Minute Ventilation | Yes | Yes |
Oxygen Saturation | Yes | Yes |
Pulse Rate | Yes | Yes |
Inspiration Set Pressure | No | Yes |
Expiration Set Pressure | No | Yes |
CPAP Set Pressure | No | Yes |
You can configure up to six TxLink 2 signals according to your therapeutic requirements (which may vary from patient to patient). You should manually configure the DC outputs for each signal, one at a time, to the output of your choice. Once you configure the DC output signals for a particular bed, you can save this configuration to use on other TxLink 2 devices.
In the Connection Manager window, locate the TxLink 2 that you want to configure and then click Connect to open the titration window.
In the titration window, click DC Outputs.
Note
If the DC Outputs tab is not visible, you can change the System setup options to add it to the titration window.
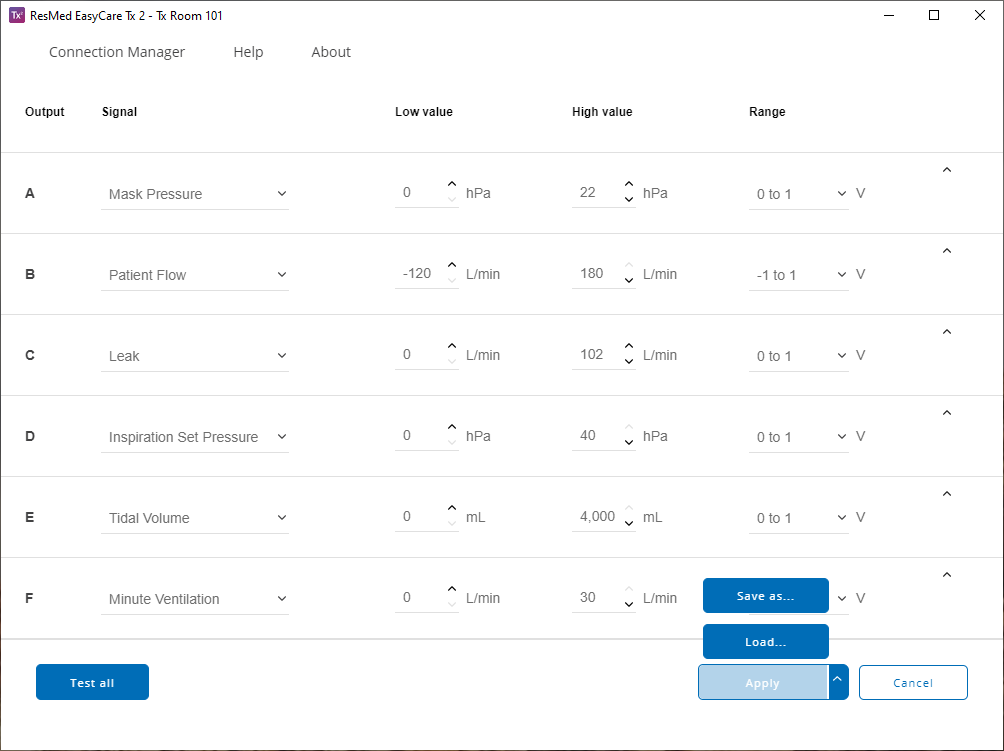
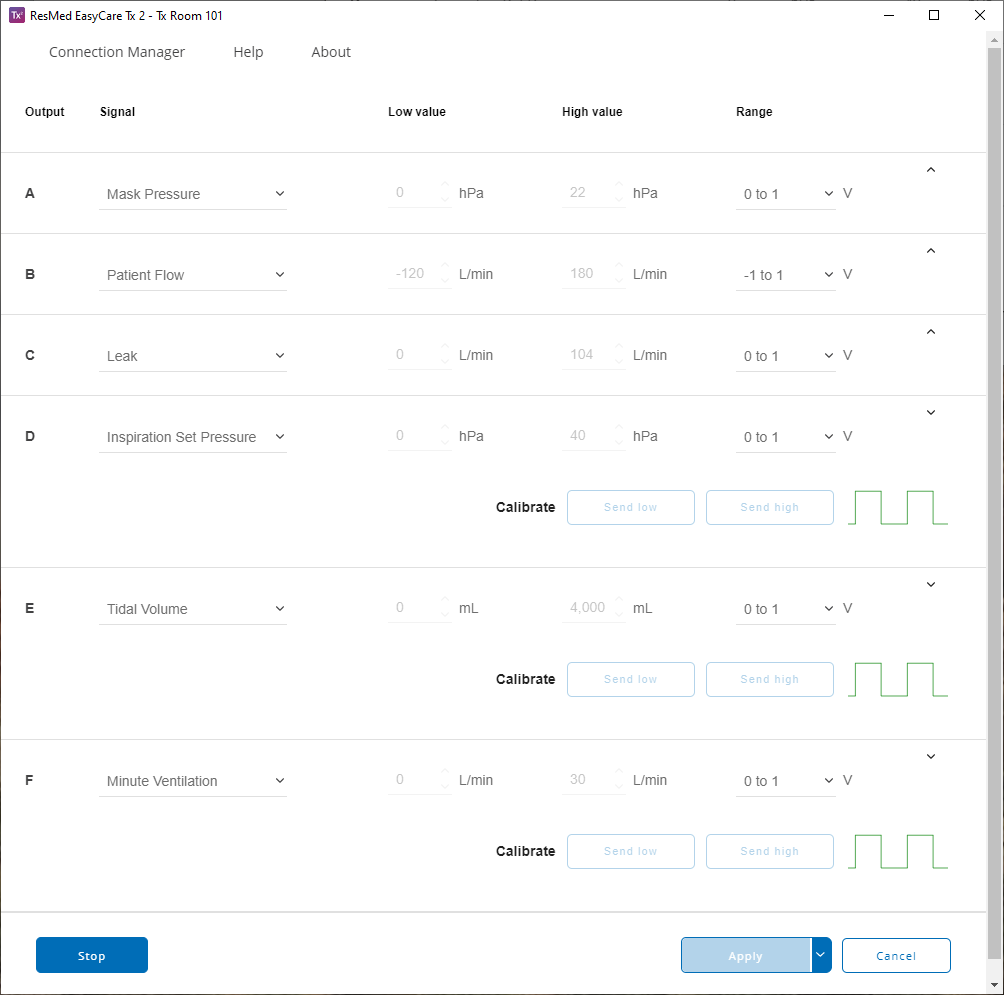
Adjust the following DC output settings as required:
Field
Description
Signal
Select the appropriate signal from the Signal lists. The Low value, High value and Range data changes to match the signal selected.
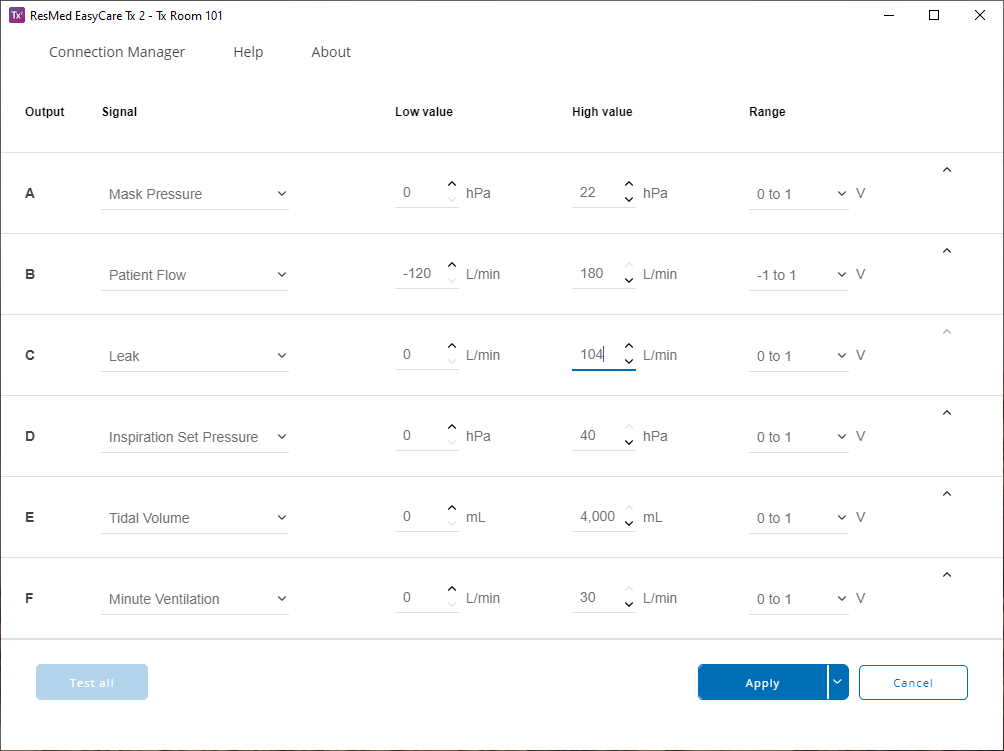
Low value
Enter the low value expected from the therapy device.
High value
Enter the high value expected from the therapy device.
Range
Select the range required on the DC outputs.
Click Apply.
Important
To save or load a DC output signal configuration, click the arrow beside Apply and click Save as to save the file. Save the file with a memorable name in a convenient location and load individual files as clinical requirements change.
After you configure the DC output signals, you must calibrate the DC outputs and test the DC output connectivity.
Calibrate DC output signals
After you configure the DC outputs, you must calibrate the corresponding PSG inputs. You can use EasyCare Tx 2 to send known high and low signal levels for this task. If you have not configured the DC outputs, see Configure DC output signals before you proceed.
In the titration window, click DC Outputs.
Select the signal (for example, Mask Pressure or Patient Flow) that you want to calibrate and click the arrow on the right side of the screen to expand that section.
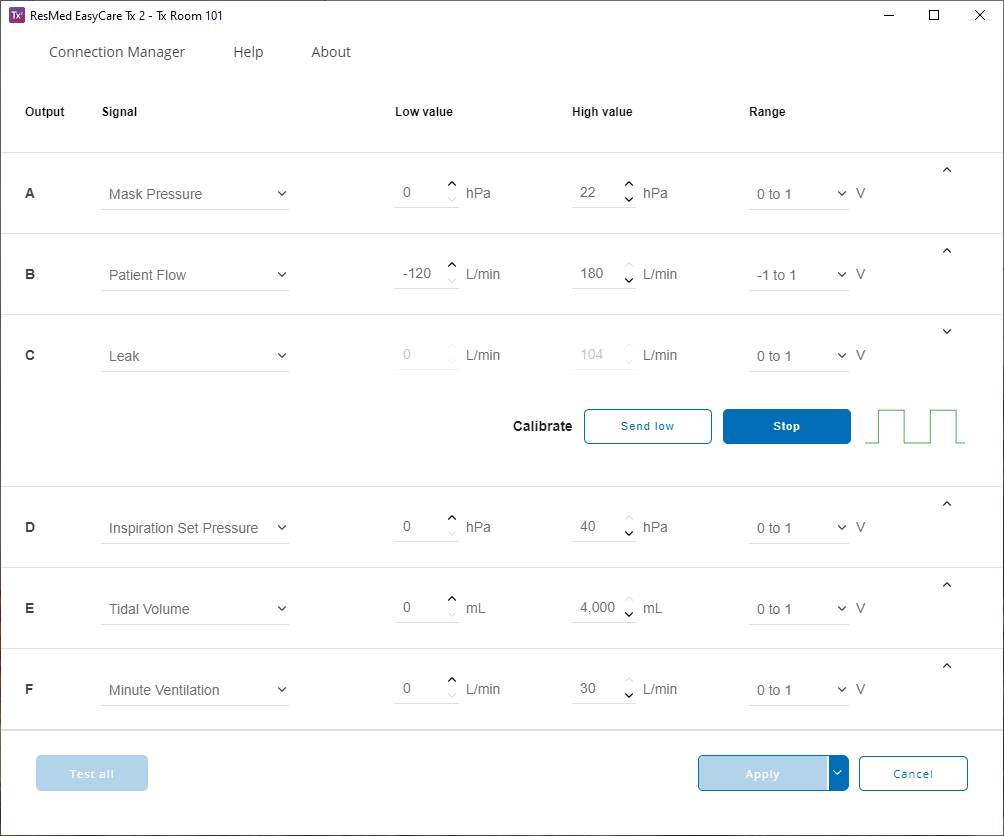
Click either Send high or Send low to send the signal to the PSG via the selected DC output.
Confirm that the PSG software receives and correctly displays the high or low signal.
Click Stop.
Repeat steps 3, 4 and 5 for all DC output channels that require calibration.
After you calibrate the DC output signals, you can test the DC output connectivity for each channel (see Test DC output connectivity).
Test DC output connectivity
It is a good practice to test DC output channels prior to starting each titration. You can confirm the proper operation of the DC output channels visually through the test signal, which appears sequentially across all outputs. Before you test the connectivity, make sure that you have configured DC outputs (see Configure DC output signals) and calibrated DC outputs (see Calibrate DC output signals).
In the titration window, click DC Outputs.
In the DC outputs window, click Test all. EasyCare Tx 2 applies a sequential square wave to each output.
Confirm that the PSG software displays a square wave. If you see a different signal, check the connectivity.
After you finish testing the signals, click Stop.
Export DC outputs
If you want to set up consistent DC output settings between TxLink 2 devices, you can save the settings for one TxLink 2 device to a configuration file. You can then apply this configuration file to other TxLink 2 devices on this computer or other computers.
Click the arrow next to Save.
Click Save as.
Choose a convenient location and a memorable file name for easy retrieval.
Import DC output settings
You can save the DC output signal configuration to a file on your computer, and then import the file and apply it to a TxLink 2 device.
In the titration window, click DC Outputs.
Next to the Save button, click the arrow and select Load.
Select the configuration file to import. The DC output data is loaded.
Click Save.