TxLink 2 installation
Using the cables supplied, connect the TxLink 2 as shown.
Bedroom | Control room |
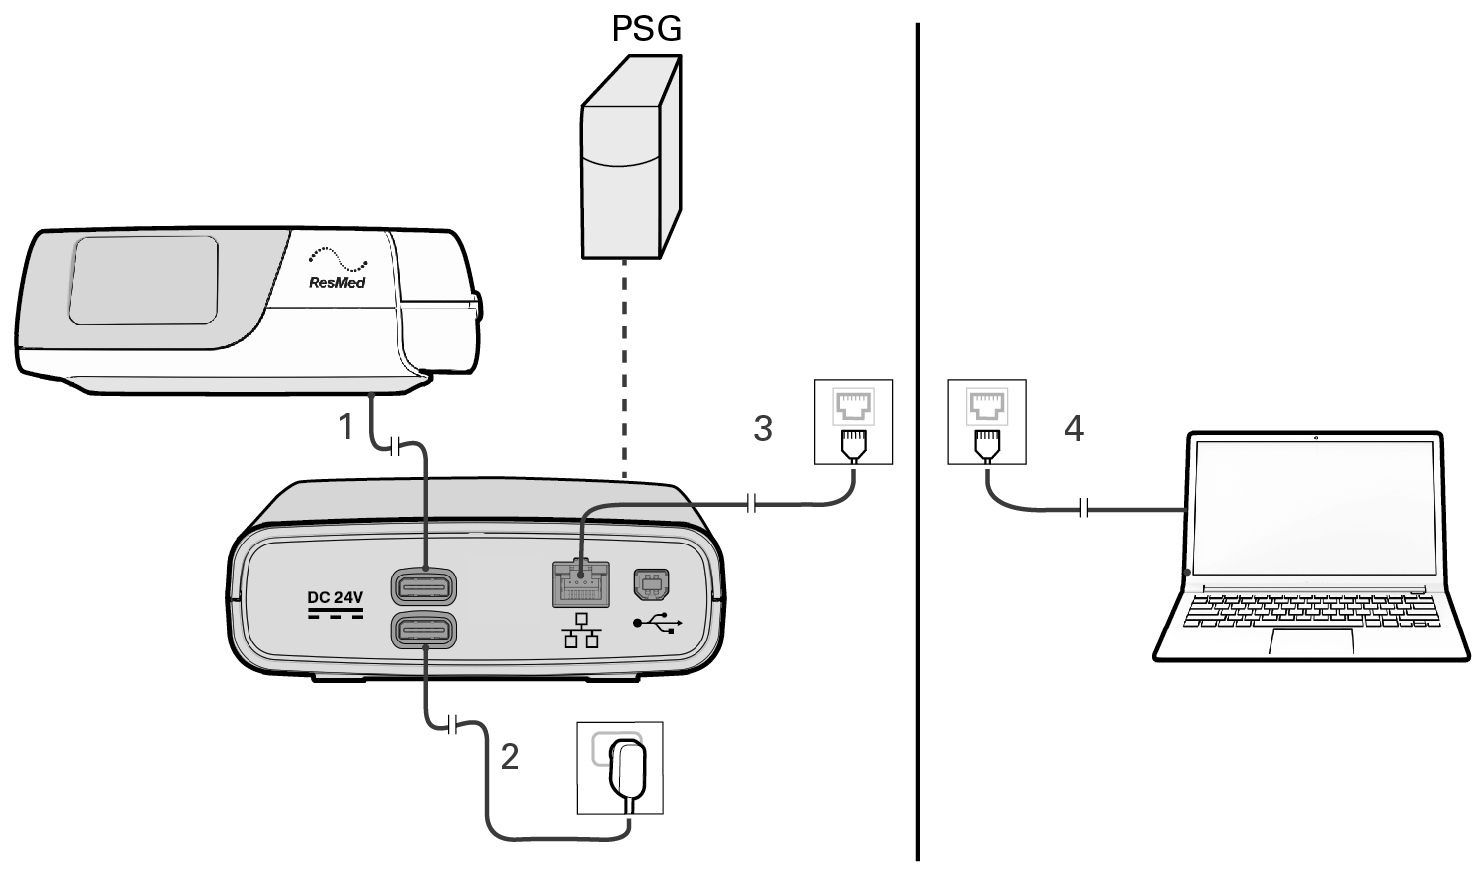 |
1 | TxLink 2 PAP device cable (power/communications) |
2 | Power supply unit |
3, 4 | Ethernet cable |
For further assistance, contact your ResMed representative or refer to the TxLink 2 User Guide.
Turning off the TxLink 2
To turn off the TxLink 2, place the connected therapy device in standby and disconnect the power cable from the power outlet or turn off the switch at the power outlet.
Turning off the TxLink 2 will also turn off the therapy device that is connected via the TxLink 2 PAP device cable (power/communications). For running the therapy device without the TxLink 2, plug the appropriate power supply unit directly into the therapy device.
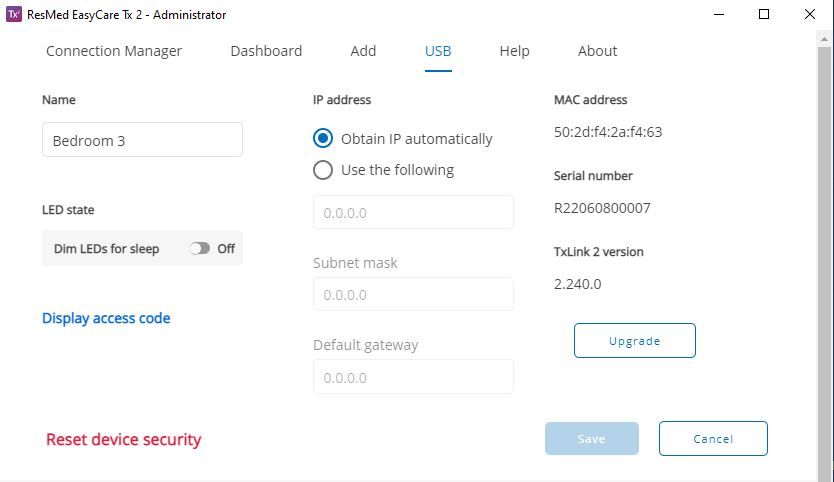
You can use EasyCare Tx 2 to view or edit the TxLink 2 Name and LED configuration as part of the TxLink 2 installation process. Refer to the table below for a description of the TxLink 2 Name and LED configuration items and their default values.
Field | Description | Default setting |
|---|---|---|
Name | A name for the TxLink 2 such as "Ward 1 - Bed 1". This name is displayed in the EasyCare Tx 2 Connection Manager. | TxLink 2 serial number |
Dim LEDs for sleep | On—Use this setting to minimize patient disturbance during titration. The power LED will be dimmed and the PAP device and network LEDs will be turned off during the titration. Off—LEDs operate with full brightness. | Off |
Note
If the TxLink 2 default settings meet your requirements, you can skip this step and use EasyCare Tx 2 to adjust the TxLink 2 configuration items after it is connected to the network.
Connect the PC to the TxLink 2 with the supplied USB cable.
Locate the EasyCare Tx 2 icon on the PC desktop. Double-click the icon.
Sign in to EasyCare Tx 2 with your Windows username and password.
When the Administrator window has opened, click USB.
Note
Ensure that the USB cable is connected.
Click Settings.
Edit the TxLink 2 Name and Dim LEDs for Sleep setting as required, then click Save.
You can use EasyCare Tx 2 to view or edit the TxLink 2 network configuration before connecting it to the network. TxLink 2 can be configured for either:
Fixed IP addressing, where a network administrator allocates an IP address to each TxLink 2, or
DHCP-managed network, where the network automatically assigns an IP address to each TxLink 2 (default configuration).
Notes
Fixed IP addressing will ensure that TxLink 2 remains unaffected by network IP address changes. TxLink 2 can be configured to connect to a DHCP-managed network; however, if the network is not set up correctly, this may result in issues outside of ResMed's control.
If the TxLink 2 default configuration meets your network requirements, you can skip this step.
Connect the PC to the TxLink 2 with the supplied USB cable.
Locate the EasyCare Tx 2 icon on the PC desktop. Double-click the icon.
Sign in to EasyCare Tx 2 with your Windows username and password.
When the Administrator window has opened, click USB.
Note
Ensure that the USB cable is connected.
Click Settings.
Click Use the following then enter the three addresses provided by your network administrator, for example:
IP address, eg, 192.168.10.11
Subnet mask, eg, 255.255.10.0
Default gateway, eg, 192.168.10.1
Then click Save.

Connect the PC to the TxLink 2 with the supplied USB cable.
Locate the EasyCare Tx 2 icon on the PC desktop. Double-click the icon.
Sign in to EasyCare Tx 2 with your Windows username and password.
When the Connection Manager window has opened, click USB.
Note
Ensure that the USB cable is connected.
Click Settings.
Click Obtain IP automatically then click Save.
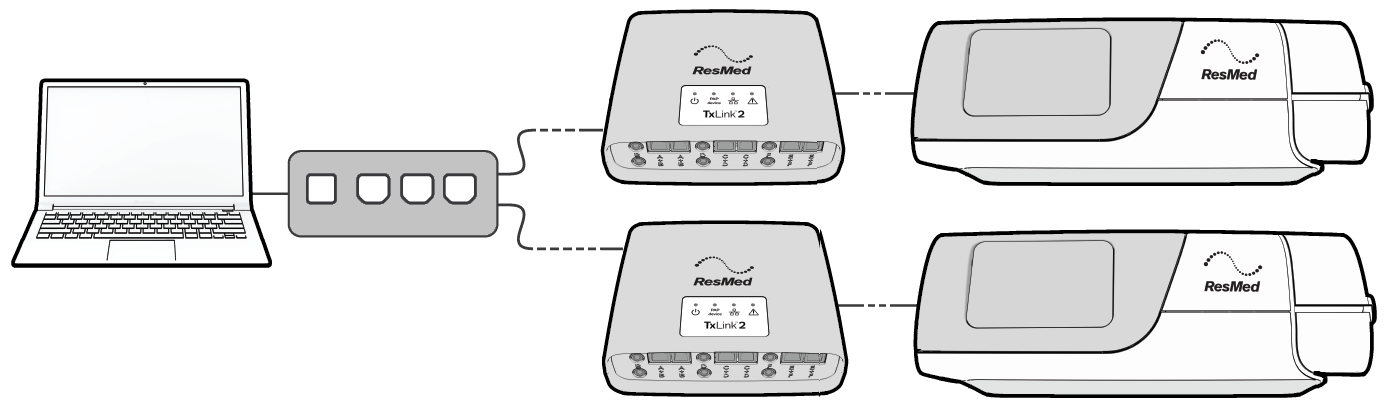 |
To control one or more ResMed therapy devices with EasyCare Tx 2, you must first establish a secure connection between EasyCare Tx 2 and each TxLink 2 over a local area network.
Note
EasyCare Tx 2 must be opened using Run as Administrator for secure connections to be made to TxLink 2.
Check that EasyCare Tx 2 has been installed on the PC (refer to EasyCare Tx 2 installation [see EasyCare Tx 2 installation] )and each TxLink 2 has the required IP addressing configuration (refer to TxLink 2 configuration [see Configure EasyCare Tx 2] ), then connect the PC and the TxLink 2 devices to the network using Ethernet cables. Use the following steps to make a secure connection to each TxLink 2:
Notes
The TxLink 2 and the PC running EasyCare Tx 2 need to be connected to the same network or subnet.
If this is not the first secure connection made from EasyCare Tx 2 to this TxLink 2, additional steps are required (refer to System Administration, Generate a TxLink 2 access code (see Additional TxLink 2 connections] ).
Right-click the EasyCare Tx 2 icon. Select Run as administrator and enter your Windows administrator username and password.
Sign in to EasyCare Tx 2 with your Windows username and password. The Connection Manager window will open and display any existing TxLink 2 connections.
Click Administrator tab, and then click Add. EasyCare Tx 2 will search for new TxLink 2 devices that have been added to the network. A new line will be displayed for each TxLink 2 found, showing the name, serial number and IP address of the TxLink 2, and also the type of therapy device connected to the TxLink 2.
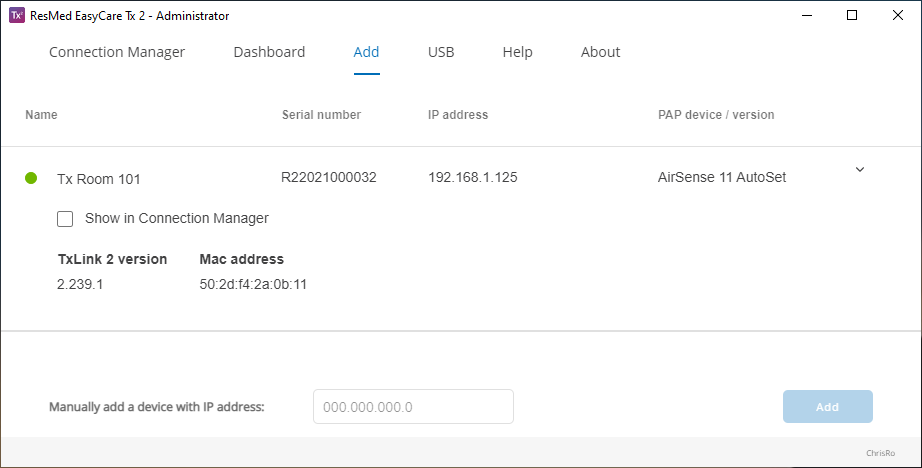
Complete the secure connection to each TxLink 2 by clicking the arrow on the right hand side of the display line, and selecting Show in Connection manager. The TxLink 2 will be removed from the added devices list.
Click the Dashboard tab and check that the added TxLink 2 devices are displayed.
To view or edit the configuration settings of a TxLink 2, click the arrow on the right-hand side of the display, and then click Settings. Adjust settings as required and click Save.

Click the Connection Manager tab. Each TxLink 2 device that EasyCare Tx 2 has established a secure connection with will be displayed. The PAP device connected to the TxLink 2 will also be displayed.
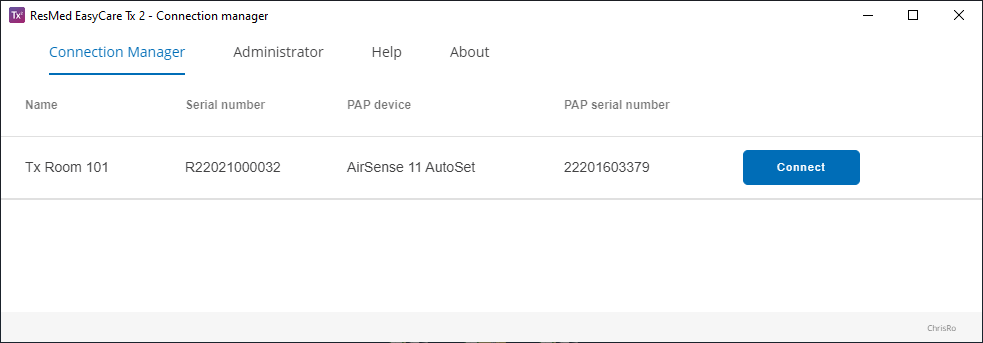
Click Connect to open the titration window for this TxLink 2, where you can configure and control the connected PAP device.
Note
EasyCare Tx 2 can concurrently control up to six connected PAP devices.
TxLink 2 has six DC outputs that transmit selected PAP device real-time data signals directly to inputs on the Polysomnograph (PSG) recording device.
Use the following steps to configure the TxLink 2 DC outputs.
Note
Refer to the PSG user guide for connecting the TxLink 2 DC outputs to the PSG inputs and set the TxLink 2 DC output ranges to suit the PSG display range.
Open EasyCare Tx 2 and sign in with your Windows username and password.
On Connection manager, identify the TxLink 2 to be configured and click Connect to open the titration window.
Note
Check that there is a PAP device connected to the TxLink 2 before you open the titration window.
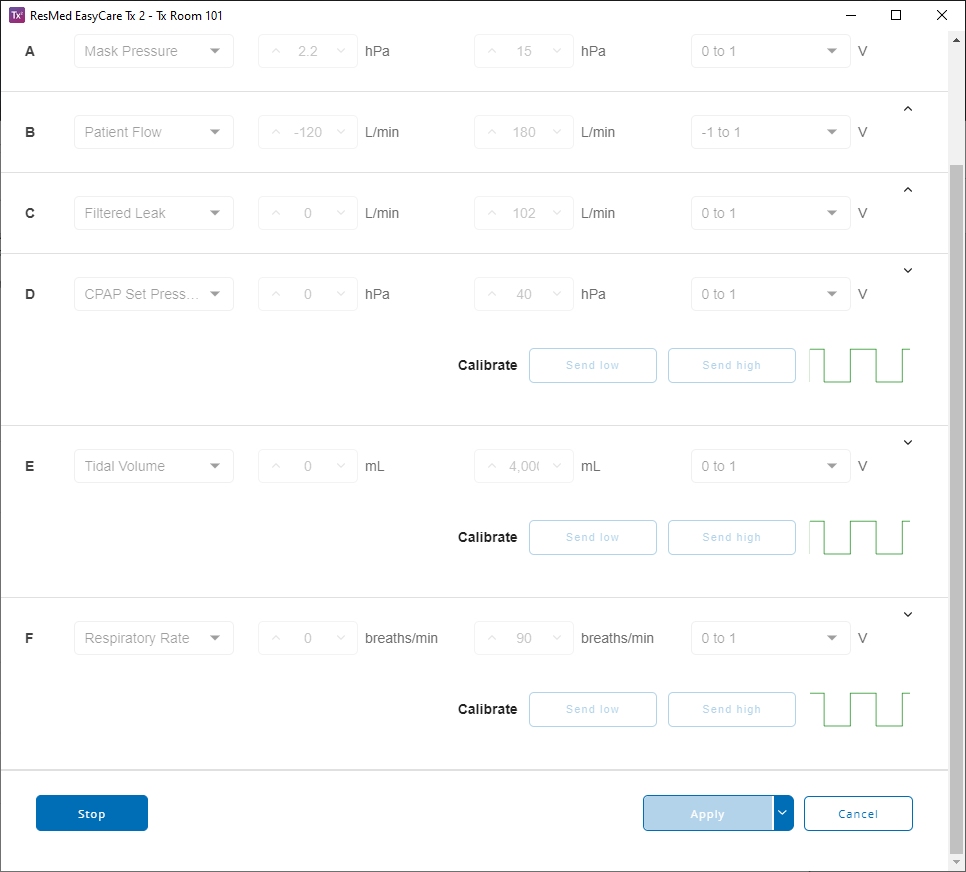
Click the DC outputs tab. The six DC output configurations will be labeled A to F. The DC output connectors on the TxLink 2 rear panel are correspondingly marked A to F.
Note
If the DC outputs tab is not displayed on the titration window, refer to System Administration (see Additional TxLink 2 connections) for enabling DC output access via Administrator options.
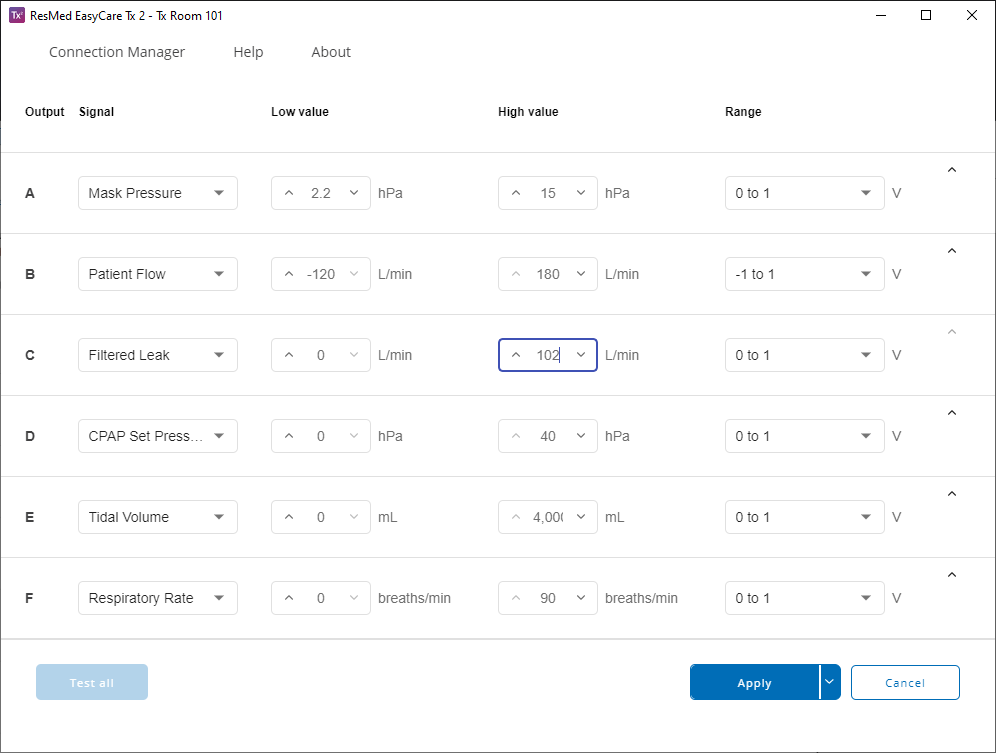
Configure each DC output as required:
Signal: Select the required therapy device signal.
Low value and High value: Select the lower and highest values expected for the signal.
Range: Select the DC output range that the signal is to be mapped to: 0 to 1 volt or -1 to 1 volt.
Once the DC outputs are configured, click Apply. Run the therapy device to confirm that the signals are correctly displayed on the PSG recording device display.
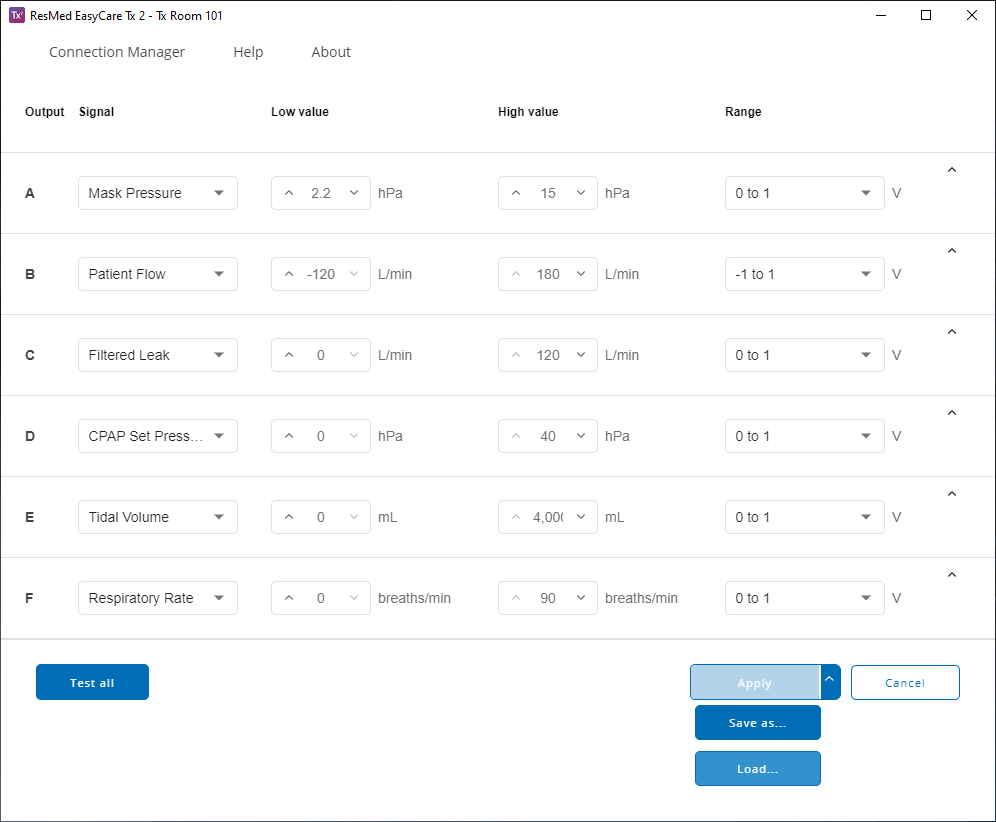
You can save the DC output configuration to a file on the PC and then load that DC output configuration at a future time using the following steps:
To save DC outputs to a file, click the arrow next to the Apply button, and click Save as. Enter the name of the file and select the required file location. Click Save.
To load DC outputs from a file, click the arrow next to the Apply button, and click Load. Navigate to the directory where the file is stored and select the file. Click Open.
 |
To calibrate each TxLink 2 DC output with the corresponding PSG input, use EasyCare Tx 2 to individually output High and Low signals on the DC outputs as follows:
Open the DC outputs window.
Select the signal to calibrate and click the arrow on the right-hand side to open the controls.
Click Send high or Send low as required.
Click Stop when calibration is complete.
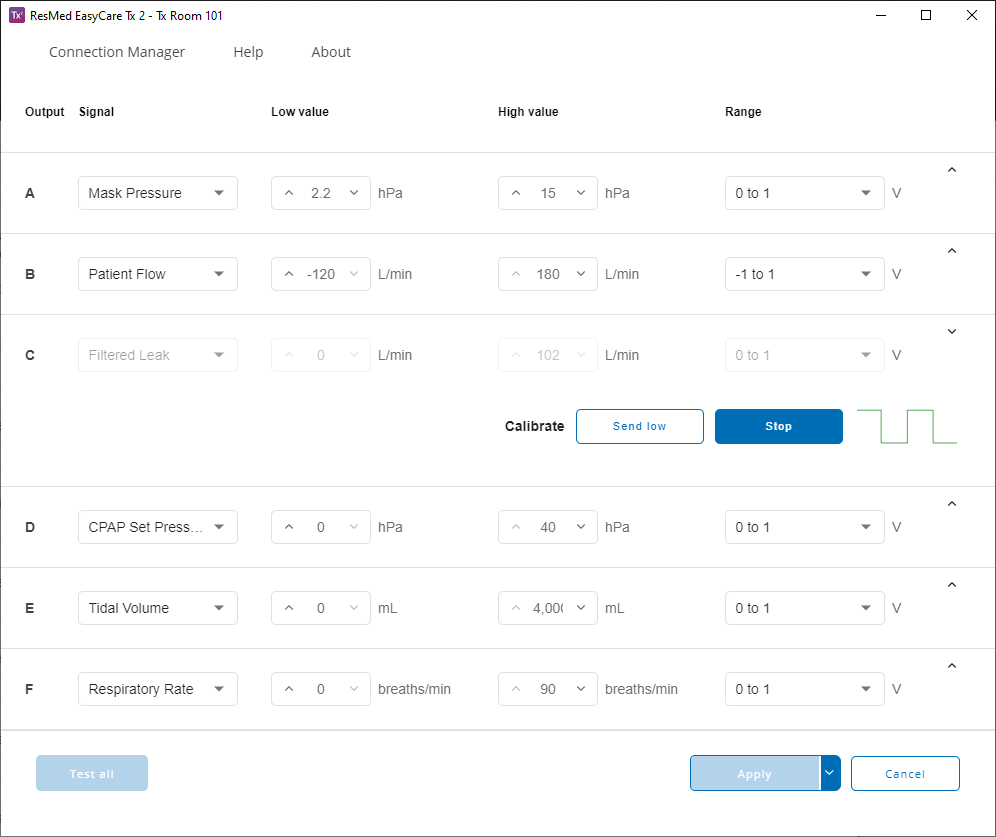 |
To test the connectivity of TxLink 2 DC outputs to the corresponding PSG inputs, use EasyCare Tx 2 to output alternating high and low signals on the DC outputs as follows:
Open the DC outputs window.
Click Test all. Each DC output will transmit a square wave, with each output A - F phase shifted compared to the other outputs.
Click Stop when testing is complete.
 |