Preparing the device for use between patients
When the device is used for multiple patients, for example, in a sleep lab, clinic, hospital or at a health care provider, the outlet connector, air tubing, cleanable humidifier tub and device enclosure should be reprocessed between each patient.
Described here are ResMed's recommended and validated procedures for cleaning and disinfecting the outlet connector, air tubing, cleanable humidifier tub and device enclosure. The person executing reprocessing activities is responsible for ensuring that reprocessing is completed in line with ResMed's validated procedures. Components not identified in the reprocessing instructions do not require reprocessing or are intended for single patient use.
Note
The standard HumidAir 11 tub cannot be reprocessed.
WARNING
Always follow cleaning and disinfection instructions. Some cleaning products may damage the components and their function or leave harmful residual vapors.
Any deviations from the procedures or claimed maximum number of cycles in this guide can have an adverse effect on the components and consequently the safety or the quality of therapy.
When using detergents, disinfectants or equipment, always follow the instructions provided by the manufacturer of those products. In the event of conflict, this guide takes precedence.
Always follow safe operating practices, including the use of appropriate Personal Protective Equipment (PPE), as required. Refer to the instructions provided by the manufacturer of those products for more details.
Beware of electrocution:
Do not immerse the device, AC Adaptor or power cord in water.
Do not connect to power while the device is wet. Make sure that all parts are dry before plugging it in.
General summary
ResMed has validated the following number of cycles for cleaning and disinfection using a manual cleaning method.
Components
System component | Cleaning - Mild alkaline, anionic detergent (eg, Alconox™) | |
|---|---|---|
Chemical high level disinfection eg, CIDEX®-OPA | Thermal high level disinfection 167ºF (75ºC) for 30 minutes | |
Outlet connector | 120 | 80 |
HumidAir 11 Cleanable tub | 120 | 80 |
ClimateLineAir 11 | 30 | 30 |
Standard tubing (2 m, 3 m) | 30 | 30 |
SlimLine | 30 | 30 |
Device
Cleaning and low level disinfection | |
|---|---|
Device Enclosure | CaviWipes1™ |
Before disassembly, turn off the device and ensure the AC adaptor has been removed.
Cleanable Humidifier tub
|
|
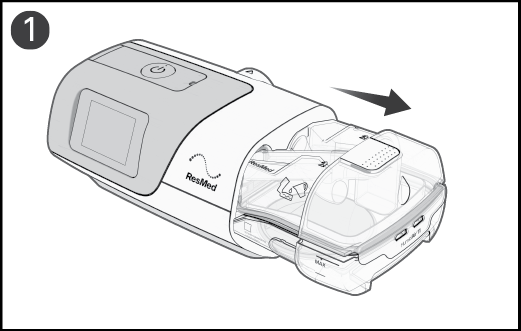
Hold the humidifier tub at the top and bottom, press it gently and pull it away from the device.
Note
Take care when handling the humidifier tub as the humidifier tub may be hot. Allow 10 minutes for the heater plate and any excess water to cool.
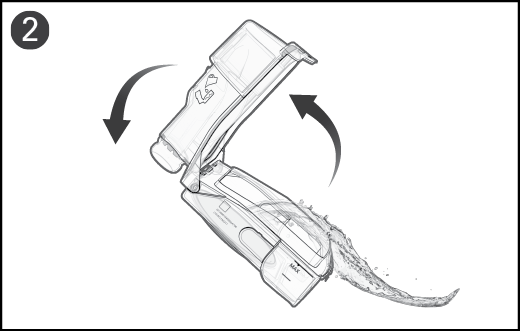
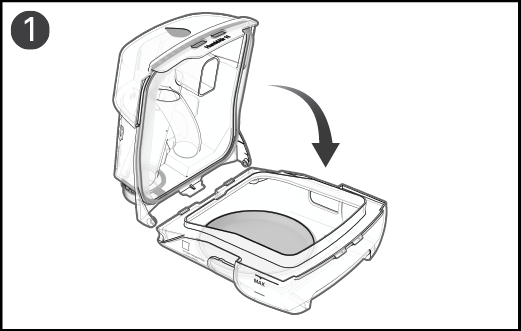
Hold the base of the humidifier tub and fully open the humidifier tub lid and pull it away so that it easily detaches from the base.
Air tubing
|
|
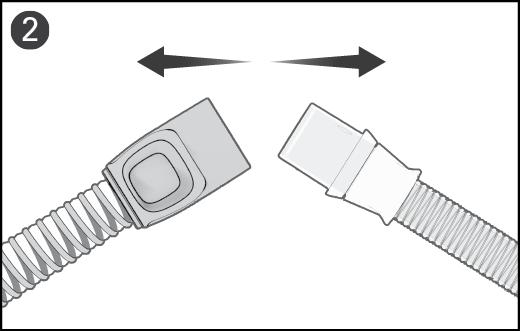
Pinch the cuff of the air tubing, and gently pull it away from the device.
Hold both the cuff of the air tubing and the swivel of the mask, then gently pull apart.
Outlet connector
|
|
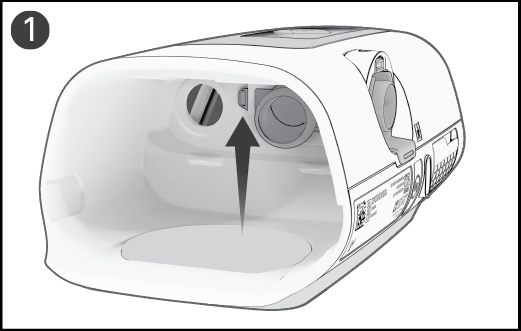
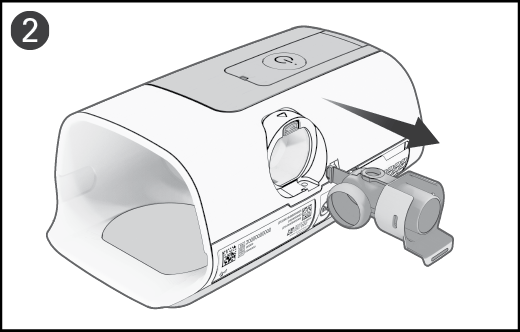
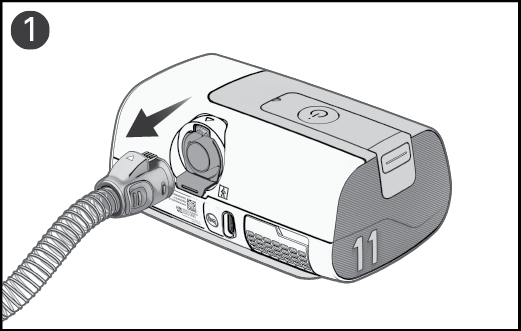
Locate the outlet connector on the inside of the device and release it by pressing the clip firmly.
Remove the outlet connector by pulling it out through the outlet connector socket at the rear of the device.
Cleaning
Clean the device enclosure using an alcohol based cleaning and disinfection wipe. ResMed has validated CaviWipes1.
Wipe the exterior of the device using a wipe until visually clean following the manufacturer's instruction for cleaning. Use a minimum of two wipes.
If visual debris is still present, perform the following:
Clean the exterior of the device with a dry, soft bristle brush and wipe the exterior of the device using a new cleaning and disinfection wipe following the manufacturer's instruction for cleaning.
Disinfection
Repeat the first step with a new wipe and follow the manufacturer's instructions for disinfection.
Note
Failure to clean the component as indicated may result in inadequate disinfection.
Drying
Allow sufficient time for the device to air dry completely.
Note
Drying is not required after cleaning if disinfection is continued immediately.
Inspection
Perform a visual inspection of the device casing. If any visible deterioration is apparent (cracking, crazing etc) discontinue use and contact your care provider or your ResMed Service Center.
Cleaning
Make a solution of a mild alkaline anionic detergent and water[1] as directed by the manufacturer's instructions. ResMed has validated:
Alconox at 1% (10 g/L) in water[1] at 69.8ºF to 131ºF (21ºC to 55ºC)
Soak all components for 5-10 minutes. Agitate the component in the cleaning solution to ensure there are no air bubbles.
Clean the inside and outside of all components with a soft bristle brush while soaking in a detergent solution. Pay particular attention to all crevices and cavities.
Tubing (Standard, SlimLine and ClimateLineAir 11): 3 minutes of brushing
Note
A soft bristle tube/bottle brush is required to clean the inside of the tubing. Remove tubes from the detergent solution to assist brushing.
Outlet connector: 1 minute of brushing
HumidAir 11 Cleanable tub: 2 minutes of brushing
Thoroughly rinse each component as follows: in 5 liters of water[1] at ≤ 140ºF (≤ 60ºC) for each component by immersing it. Rinse tubing for 30-60 seconds. Agitate the component in the rinsing water to ensure there are no air bubbles.
Repeat the rinse procedure two additional times using fresh water[1] for a total of three rinses.
Note
Failure to clean the component as indicated may result in inadequate disinfection.
Inspection
Inspect and if required, repeat the cleaning steps until visually clean. Shake air tubing to remove excess water.
Drying
Allow the components to dry out of direct sunlight.
Note
Drying is not required after cleaning if thermal disinfection is continued immediately.
In the following procedures, only one disinfection process needs to be performed: Thermal disinfection OR Chemical disinfection.
High level thermal disinfection
Immerse the components in a water[2] bath. Agitate the components in the water bath to ensure no air bubbles are trapped.
Soak the components in a hot water bath. ResMed has validated:
Water bath: at 167ºF (75ºC) for 30 minutes.
Note
Higher temperatures may damage the components.
Allow the components to dry out of direct sunlight.
OR
High level chemical disinfection
Make a solution of CIDEX OPA (Ortho-phthalaldehyde 0.55%) as directed by the disinfectant manufacturer. ResMed has validated:
CIDEX OPA at 69.8ºF to 77ºF (21ºC to 25ºC)
Soak the components in the solution at room temperature (approximately 69.8ºF to 77ºF (21ºC to 25ºC) for 12 minutes. Agitate the components in the disinfection solution to ensure there are no air bubbles.
Rinse and agitate the components in water[2] 5 liters per component at ≤ 140ºF (≤60ºC) for 1 minute. Shake air tubing to remove excess water.
Repeat the rinse procedure two additional times using fresh water[2] for a total of three rinses.
Allow the components to dry out of direct sunlight.
Inspection
Perform a visual inspection of each component. If any visible deterioration is apparent (holes, tears or cracks etc) replace the component.
Once the components are dry, reassemble the device.
Outlet connector
|
|
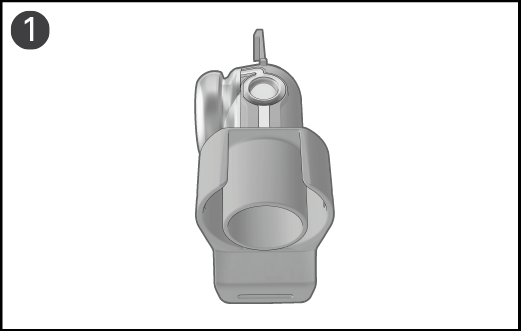
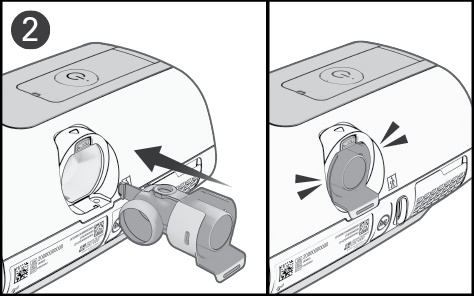
Hold the outlet connector with the seal pointing to the left and the clip pointing forward.
Make sure the outlet connector is correctly aligned and insert the outlet connector into the socket. It will click in place.
Cleanable HumidAir 11 tub
|
|
Insert one side of the lid into the pivot hole of the base. Insert the other side of the lid into the pivot hole.
Push the lid down until it clicks in place.
Note
The HumidAir 11 Standard tub must be replaced between patients.
Air tubing
Connect the air tubing firmly to the air outlet located on the rear of the device.
Connect the free end of the air tubing firmly onto the assembled mask.
Store in a dry dust-free environment away from direct sunlight.
Storage and transport temperature: -13°F to +158°F (-25°C to +70°C)
Storage and transport humidity: 5 to 95% relative humidity, non-condensing